
AI Image Upscaler
Mariano215/ai-image-upscaler
Amplie imagens até 8× com IA mantendo nitidez para impressão profissional
Ver no GitHubFerramenta de super-resolução baseada em Real-ESRGAN para ampliar imagens com qualidade profissional, mantendo nitidez de bordas e texturas. Disponível como CLI Python e skill Claude Code, com suporte para especificar tamanho exato em polegadas/DPI para impressão. Processa arquivos PSD, gera TIFFs com perfil sRGB pronto para gráfica.
Instalação
npx convez-ai Mariano215/ai-image-upscaler1 comando no terminal: detecta o formato do repositório (marketplace ou plugin avulso) e instala via Claude Code. Requer Node 18+ e o Claude Code instalado.
Métricas
Casos de uso
- Preparar artes para impressão em pôsteres e grandes formatos
- Restaurar imagens antigas ou de baixa resolução mantendo detalhes
- Upscaling de designs com texto e gráficos para manter legibilidade
Veredito

Solução técnica sólida para um problema real de pré-impressão. O suporte a especificação DPI/polegadas e tiling inteligente a diferencia de upscalers genéricos, mas exige familiaridade com CLI e GPU.
README
A tradução para o português deste README ainda está na fila.
ai-image-upscaler
AI super-resolution upscaling for print. Turn a small or low-resolution image into a print-ready high-resolution file — a TIFF at an exact inch size and DPI — using a Real-ESRGAN super-resolution model. Ships as both a standalone Python CLI and a Claude Code skill.
Plain interpolation (Photoshop "Image Size", PIL.Image.resize) goes soft past ~2×. A
super-resolution model reconstructs clean edges and plausible texture, which is what makes a 5–8×
enlargement look professional at poster sizes.
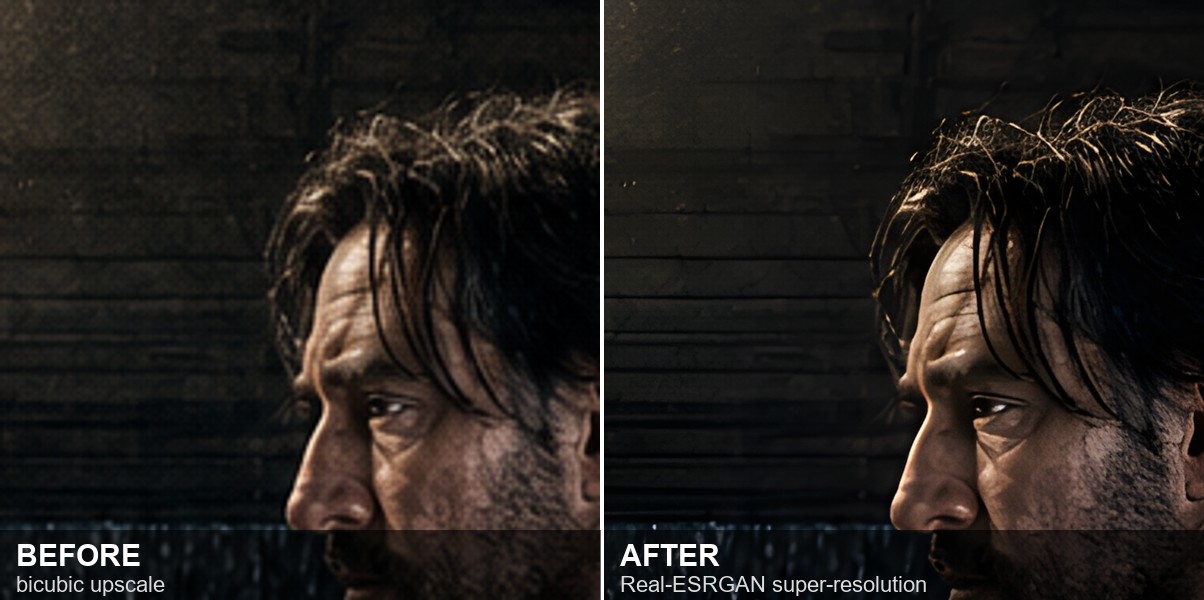
7× enlargement of a face detail — bicubic (left) vs Real-ESRGAN (right): hair strands, skin texture, and the brick behind resolve cleanly instead of smearing. Sample art from the Brothers film poster © 2026 Mariano Mattei, shown for illustration only and not covered by this repository's MIT license.
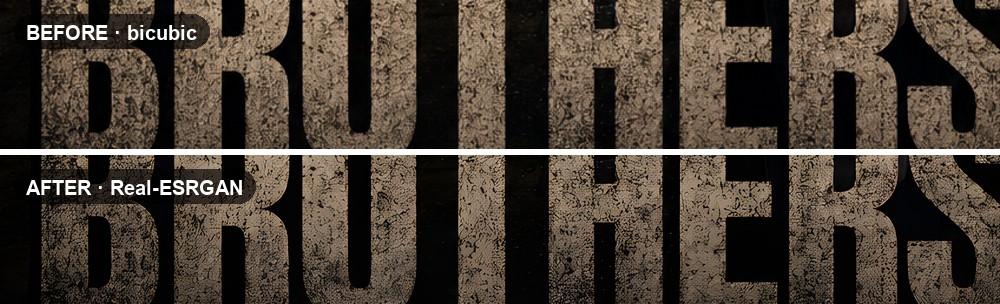
The same on text inside an image — the "BROTHERS" title: bicubic (top) softens the letterforms and the distressed texture; Real-ESRGAN (bottom) holds crisp edges and rebuilds the grunge detail. This is why upscaled posters keep readable, sharp type instead of mushy lettering.
Web app — upscale in your browser, no install
Prefer a GUI? Open the web app → — drop in an image, pick a target, and upscale entirely in your browser. Nothing is uploaded: the model runs locally on your GPU via WebGL (UpscalerJS / TensorFlow.js). Light/dark themes, a before/after compare slider, and downloads that carry the chosen DPI. Designed by Mattei Systems.
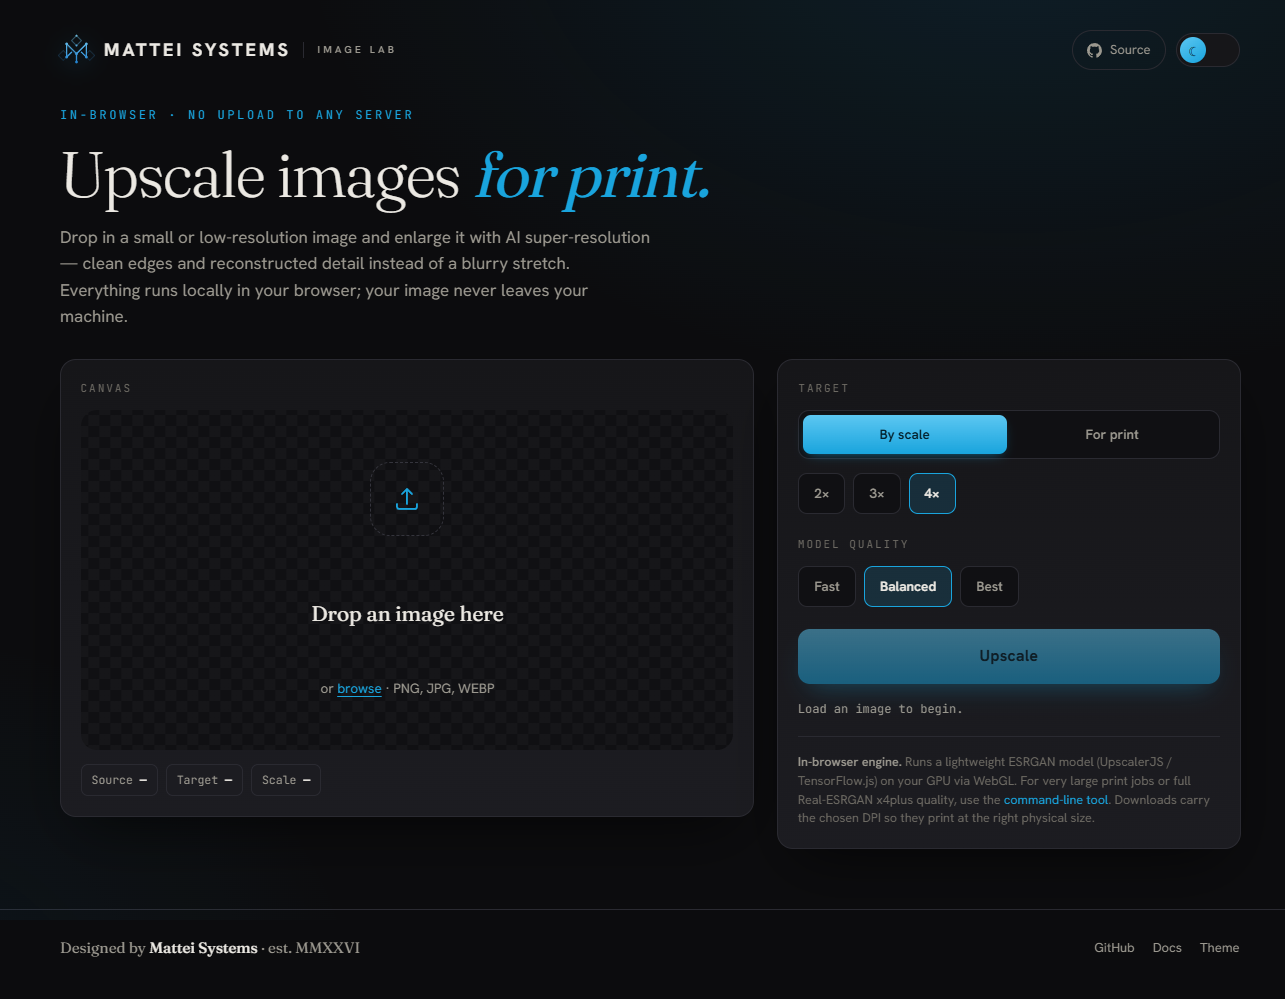
The browser engine is a lightweight ESRGAN model — ideal for quick previews and moderate enlargements. For full Real-ESRGAN x4plus quality or very large print sizes, use the command-line tool below. The web app is a single self-contained file in
docs/.
Features
- Target by inches + DPI (
--inches 24x36 --dpi 300) or by exact pixels (--pixels 7200x10800). - Tiled GPU inference with feathered blending — handles huge canvases without VRAM spikes or seams.
- Auto multi-pass: runs as many 4× passes as needed to reach the target, then Lanczos-resamples to the exact size (downsampling from a higher pass = sharper edges than interpolating up).
- Print-ready output: RGB TIFF tagged at the target DPI, sRGB profile embedded, LZW-compressed, plus a JPEG proof for quick review.
- PSD aware: reads a Photoshop file's merged composite directly (no manual flatten).
- Aspect handling:
--fit cover|contain|stretchfor size mismatches. - Weights auto-download on first run; swap models with
--model. - Cross-platform, auto device: Windows / macOS / Linux; uses CUDA, Apple MPS, or CPU automatically.
Requirements
Runs on Windows, macOS, and Linux with Python 3.9+. Dependencies: torch, spandrel, pillow,
numpy.
A virtual environment is recommended (torch is large):
python -m venv .venv
# Windows (PowerShell):   .venv\Scripts\Activate.ps1
# macOS / Linux:          source .venv/bin/activate
pip install -r requirements.txt
The compute device is auto-detected — CUDA (NVIDIA) → MPS (Apple Silicon) → CPU — or force it with
--device {auto,cuda,mps,cpu}. A GPU is strongly recommended; CPU works but is slow on large canvases.
Per platform:
- NVIDIA GPU: install a CUDA build of torch from pytorch.org,
e.g.
pip install torch --index-url https://download.pytorch.org/whl/cu124. - Apple Silicon (M-series): the default
pip install torchincludes Metal/MPS — nothing extra needed. - CPU-only: the default torch from PyPI works everywhere; expect long runtimes on big targets.
Why spandrel and not the
realesrganpip package? The official package depends onbasicsr, which is broken on torchvision ≥ 0.17 (torchvision.transforms.functional_tensorwas removed).spandrelloads the model weights directly and avoids the whole problem — and supports many other super-resolution architectures too.
Usage
# 24x36 inch poster at 300 dpi (7200x10800 px)
python scripts/upscale_for_print.py --src poster.psd --inches 24x36 --dpi 300

# exact pixel target
python scripts/upscale_for_print.py --src in.png --pixels 7200x10800

# illustration / anime art (smoother model)
python scripts/upscale_for_print.py --src art.png --inches 18x24 --model realesrgan-x4plus-anime
Output is written next to the source as <name>_<W>x<H>.tif (override with --out), plus a
*_proof.jpg.
Flags
| Flag | Default | Purpose |
|---|---|---|
--src | (required) | Source image: png / jpg / tif / psd / … |
--inches WxH | — | Print size in inches (combine with --dpi) |
--pixels WxH | — | Exact pixel target (alternative to --inches) |
--dpi | 300 | DPI for --inches, and the value tagged into the output |
--out | <src>_<W>x<H>.tif | Output path; .tif → LZW, otherwise honors the extension |
--model | realesrgan-x4plus | realesrgan-x4plus (photo) or realesrgan-x4plus-anime |
--device | auto | auto (cuda → mps → cpu), or force cuda / mps / cpu |
--fit | cover | Aspect mismatch: cover (fill+crop), contain (pad), stretch |
--passes | auto | Force N 4× passes (0 = auto: enough to reach target) |
--two-pass | off | Force ≥ 2 passes for extra crispness |
--tile / --overlap | 512 / 32 | Tiling controls for VRAM / seam tuning |
--no-proof | off | Skip the JPEG proof |
How it works
- Load the source (RGB; PSD → merged composite).
- Run the model in overlapping tiles, blending with a feathered window so there are no seams.
- Repeat 4× passes until the result meets or exceeds the target in both dimensions.
- Lanczos-resample to the exact target size, applying the chosen
--fitfor any aspect mismatch. - Save an sRGB, DPI-tagged TIFF (LZW) so it physically prints at the requested inches, plus a proof.
Models
Default realesrgan-x4plus (neutral, great for photos and photoreal art); realesrgan-x4plus-anime
for illustration/line art. spandrel auto-detects many architectures, so most community .pth
upscalers can be added with a one-line entry in the MODELS dict. See
references/models.md.
Install as an agent skill (Claude Code & Codex)
This repo is also an Agent Skill. The SKILL.md format is shared across agents, so the
same clone works in both Claude Code and OpenAI Codex — install it by cloning into the tool's
skills directory. (After cloning, install the deps so the agent can run it: pip install -r requirements.txt.)
Claude Code — personal skill at ~/.claude/skills/:
git clone https://github.com/Mariano215/ai-image-upscaler.git ~/.claude/skills/upscale-for-print
Codex — personal skill at ~/.agents/skills/ (skills replaced the now-deprecated custom prompts):
git clone https://github.com/Mariano215/ai-image-upscaler.git ~/.agents/skills/upscale-for-print
For a project-scoped install instead of personal, clone into .claude/skills/upscale-for-print
(Claude Code) or .agents/skills/upscale-for-print (Codex) inside the repo you're working in.
On Windows,
~is your user folder (C:\Users\<you>). PowerShell and Git Bash expand~; plaincmd.exedoes not, so spell out the full path there.
Once installed, just ask — "upscale this poster to 24×36 at 300 dpi for print" — and the agent
follows SKILL.md: inspect the source, pick the best file, check aspect, run the script,
and verify the output. You can also invoke it explicitly: /upscale-for-print in Claude Code,
$upscale-for-print in Codex. To update later, git pull inside the cloned skill folder.
Limitations
- A large upscale (≳ 6×) produces clean, sharp results at normal poster viewing distance but cannot invent true native detail — it is not equivalent to a natively-captured high-res image.
- JPEG sources amplify compression artifacts; prefer a lossless original (PSD / PNG / TIFF).
- Default output is RGB. If your print vendor requires CMYK with a specific ICC profile,
convert with
PIL.ImageCmsusing their profile.
License
MIT © 2026 Mariano215