
AkerMCP
lorenzo-cambiaghi/AkerMCP
mcp bridge to game engines functionalities
Instalação
npx convez-ai lorenzo-cambiaghi/AkerMCP1 comando no terminal: detecta o formato do repositório (marketplace ou plugin avulso) e instala via Claude Code. Requer Node 18+ e o Claude Code instalado.
Métricas
README
A tradução para o português deste README ainda está na fila.
AkerMCP


                                         Aker (Egyptian: ꜣkr) was an
                                         ancient Egyptian earth god,
                                         often depicted as two lions
    /\__/\             /\__/\            seated back-to-back facing
  (  -.-  )          (  -.-  )           opposite horizons. Named
  >       <          >       <           Sef and Duau (Yesterday and
   /      )          (      \            Today), they guarded the
   \      /          \      /            passage of the sun through the
    | /    \        /    \ |             underworld, opening the gates
    | |    )|      |(    | |             for its safe transit.
  (___)  _//        \\_  (___)
       _\_/          \_/_                In this architecture, Aker
                                         serves as the unyielding
                                         bridge: one face speaking
                                         JSON-RPC to the LLM, the
                                         other manipulating the
                                         engine's main thread via IPC.
Give your AI Assistant (Claude, Cursor, Copilot, Antigravity) the power to directly manipulate any C# Game Engine.
Traditionally, AI coding assistants can only suggest code for you to copy-paste. With AkerMCP, you grant your AI the ability to actually see and touch your game project in real-time. AkerMCP is 100% C# engine-agnostic—it works seamlessly with Unity, Godot, Stride, Flax Engine, or any custom C# engine simply by dropping in a lightweight adapter.
🪄 The "Wow" Factor: Talk to your Engine
Imagine asking your AI:
"Hey, make the Player character 20% bigger, turn all enemy materials red, and spawn 50 trees scattered across the ground plane."
- Without AkerMCP: The AI writes a custom script, explains where to put it, you switch to Unity, attach it, press play, and hope it works.
- With AkerMCP: The AI just does it. Instantly. Right inside your Unity Editor. You watch the scene change before your eyes.
AkerMCP acts as a seamless bridge. It allows AI agents to inspect your scene hierarchy, modify GameObjects, and even execute complex procedural C# scripts on the fly. No more manual repetitive clicking in the inspector—just tell your AI what you want to achieve.
Example: "Spawn 10 spheres in a circle with a radius of 10"
for (int i = 0; i < 10; i++) {
    float angle = i * Mathf.PI * 2 / 10f;
    Vector3 pos = new Vector3(Mathf.Cos(angle) * 10f, 0, Mathf.Sin(angle) * 10f);
    GameObject sphere = GameObject.CreatePrimitive(PrimitiveType.Sphere);
    sphere.transform.position = pos;
    sphere.name = $"Aker_Sphere_{i}";
}

(Curious about the internal technical details? Jump to the Architecture section).
🏆 Real-World Case Studies
To truly understand the unprecedented power of AkerMCP, consider these two real-world sessions:
Case Study 1: The "Invisible" GPU Bug
A developer's Custom Voxel Ambient Occlusion (AO) was rendering completely flat, making underground caves far too bright.
- Without AkerMCP, an AI assistant is blind. It can only read your shader code, guess what might be wrong, and give you a list of 5 things to check manually. You are left recompiling, entering Play Mode, attaching debuggers, and iterating blindly for hours because the state lives entirely in GPU memory.
- With AkerMCP, the AI sits at your desk:
- Visual Verification: By calling
take_screenshoton the Scene View, the AI visually confirmed the user's report: "The overall look is flat and washed out. The caves aren't dark at all." - Dynamic Editor Control: The AI wrote an on-the-fly C# Roslyn script via the
executetool to force theVoxelWorldGIpipeline into a pure "Debug 10 (Grayscale AO)" mode. A second screenshot confirmed the AO channel was completely white (AO ≈ 1.0). - CPU Memory Inspection: To check if the voxelization was failing, the AI wrote another script to read the
_cellsarray in CPU memory, counting 29,408 occupied solid voxels. Voxelization was working perfectly. - 3D Texture Readback: Realizing the bug was in the Cone-Tracing pass, the AI wrote a complex script to perform a GPU readback of the
Texture3Dradiance buffer. Unity only returned the 0-depth slice by default, so the AI rewrote its script to iterate and aggregate all 104 volume layers. - The Smoking Gun: By analyzing the aggregated buffer, the AI discovered the alpha channel was mirroring the raw occupancy data instead of the calculated AO. It immediately pinpointed the exact failure: an empty mip-map chain generation step meant the cones couldn't trace any occlusion.
- Visual Verification: By calling
In just minutes, the AI diagnosed a complex, data-dependent GPU bug. It didn't just write code; it acted as a Technical Artist—triggering Editor pipelines, reading multidimensional arrays from VRAM, taking visual snapshots, and confirming hypotheses through interactive feedback.
Case Study 2: The "Context-Aware" Shader Architect
In another session, the user wanted standard (non-voxel) meshes to react to the lighting data generated by the custom Voxel Engine.
- Without AkerMCP: The AI might provide generic HLSL code. The user would have to manually create the
.hlslinclude files, figure out how to wire them up to Unity's Shader Graph as Custom Function Nodes, and hope the variable names matched the engine's internals. - With AkerMCP (and LynxMCP):
- The AI searched the project's custom C# and Shader code to understand exactly how the Voxel Engine stored its lighting buffers (e.g.
_VoxelGridMipped). - It wrote an HLSL include file specifically tailored to the project's architectural quirks.
- Using the
executetool, the AI tapped into Unity'sAssetDatabaseto automatically create and save the.hlslfiles in the correctAssets/directory. - It didn't stop at the code. Recognizing that Unity Shader Graphs are JSON files under the hood, the AI used the
executetool to programmatically construct and save a complete.shadergraphasset directly into the project. This graph automatically wired up the new HLSL Custom Function Node to the PBR Master node. - Visual A/B Testing (Zero User Input): Finally, the AI didn't just assume it worked. It used
executeto create a new Material using the generated shader, spawned two identical test objects in the scene—one with a standard shader, and one with the new Voxel GI shader—and applied the materials itself. It then took atake_screenshotto visually compare them side-by-side, proving the custom Global Illumination was contributing correctly, completely autonomously.
- The AI searched the project's custom C# and Shader code to understand exactly how the Voxel Engine stored its lighting buffers (e.g.
AkerMCP turns the AI from a simple "code generator" into an autonomous Technical Artist that not only writes the shaders, but natively integrates them into the engine's asset pipeline.
🦁 How it Works (Under the Hood)
Traditional MCP integrations for game engines ship 100+ hand-written tools — one per operation, one per component type. Every engine update breaks them.
AkerMCP replaces all of that with 14 generic tools powered by runtime reflection and Roslyn. A single set_property tool can modify any property on any object in any engine, while the execute tool enables complex procedural generation via C# scripts. The take_screenshot tool closes the loop, giving the AI a way to visually verify what it just changed. The engine-specific adapter provides the necessary layer for interacting directly with the engine's API.
AI: "Set the player's position to (10, 0, 5)"

→ set_property {"object_path": "/Player", "property_path": "position", "value": {"x":10,"y":0,"z":5}}
← Property 'position' set successfully on /Player
No custom tool class needed. No code generation. Just reflection.
Features
- 14 Generic Reflection-Based Tools: Operate on any object or component without custom tool definitions.
- Roslyn-Powered Dynamic Execution: Send arbitrary C# scripts via the
executetool to perform complex procedural tasks or bulk operations directly within the Unity Editor. - Visual Verification (
take_screenshot): Hybrid capture pipeline — engine-internal render-buffer capture when available (highest quality, works occluded), with cross-platform OS-level fallback (PrintWindowon Windows, QuartzCGWindowListCreateImageon macOS). Output is auto-resized and JPEG-encoded via ImageSharp to fit AI image limits. - MessagePack IPC Protocol: High-performance, low-latency binary communication between the standalone MCP Server and the engine plugin.
- Robust Type System: Serializes and deserializes Unity-specific structs (
Vector3,Color,Bounds) seamlessly. - Engine-Agnostic Core: Shared .NET Standard 2.1 core makes it easy to port to Godot, Stride, Flax Engine, or other C# engines by writing a simple adapter.
The Perfect Combo: AkerMCP + LynxMCP
AkerMCP gives your AI agent the hands to manipulate the active scene and execute runtime code. But to be truly effective, the AI also needs the brain to understand your entire project architecture and dependencies.
We highly recommend running AkerMCP alongside LynxMCP, our local RAG (Retrieval-Augmented Generation) server designed for codebases.
When combined, your AI gets a complete global vision:
- LynxMCP provides deep, semantic search over your custom C# scripts and up-to-date Unity/library documentation (feeding the AI with exact APIs and patterns it wouldn't otherwise know from its standard training data).
- AkerMCP uses that exact context to write and execute flawless Roslyn scripts directly in your Editor.
Table of Contents
- The Perfect Combo: AkerMCP + LynxMCP
- Quick Start (Recommended)
- Connecting an AI Client
- Advanced: Building from Source (For Developers)
- Verifying the Connection
- MCP Tools
- MCP Resources
- Type System
- Example Session
- Architecture
- Writing an Engine Adapter
- AI Integration Rules
- Troubleshooting
- License
Quick Start (Recommended)
You do not need to install the .NET SDK or compile any code.
1. Unity Setup
-
Go to the
Build/folder in this repository and downloadAkerMCP.unitypackage. -
Open your Unity project and double-click the package to import it. (This package already contains all necessary C# scripts, dependencies, and Roslyn compilers).
-
(Optional) Open the menu AkerMcp → Setup Test Scene to create a ready-to-test scene.
-
Open Window → AkerMcp and click Start AkerMcp Plugin. You should see a green Running status. (Tip: The plugin must be running before you start the server. The server discovers it automatically via a lock file).
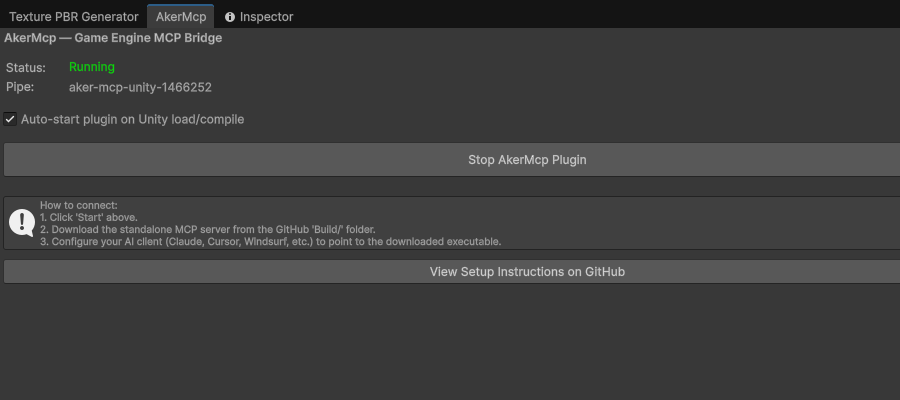
2. MCP Server Setup
- Go to the
Build/folder. - Download the standalone server for your OS (
AkerMcp.Server-*.zipor.tar.gz). - Extract the archive anywhere on your computer.
Connecting an AI Client
Point your AI client to the standalone executable you extracted in Step 2.
Important: Make sure the Unity plugin is running (green status in the AkerMcp window) before using any tools from the AI client.
Claude Code (CLI)
claude mcp add game-engine -- /absolute/path/to/extracted/AkerMcp.Server
Claude Desktop / Cursor / Windsurf
Open the MCP settings (or claude_desktop_config.json) and add the server:
{
  "mcpServers": {
    "game-engine": {
      "command": "/absolute/path/to/extracted/AkerMcp.Server",
      "args": []
    }
  }
}
Windows users: Replace the command path with the full Windows path to the
.exe, for example"C:\\Tools\\AkerMcp.Server\\AkerMcp.Server.exe". Remember to use double backslashes in JSON!
Google Antigravity
Antigravity reads mcp_config.json from its user-data directory (~/.gemini/antigravity/ or %USERPROFILE%\.gemini\antigravity\). Add:
{
  "mcpServers": {
    "game-engine": {
      "command": "C:/Tools/AkerMcp.Server/AkerMcp.Server.exe",
      "args": [],
      "type": "stdio"
    }
  }
}
VS Code + Copilot
Add to your .vscode/settings.json or use the MCP: Add Server command:
{
  "mcp": {
    "servers": {
      "game-engine": {
        "command": "C:\\Tools\\AkerMcp.Server\\AkerMcp.Server.exe",
        "args": []
      }
    }
  }
}
Alternative: Running from Source (For Developers)
If you cloned the repository or prefer running via the .NET SDK instead of using the standalone binaries, use dotnet run. This is often necessary if you are actively modifying the MCP server code.
CLI command:
claude mcp add game-engine -- dotnet run --project /absolute/path/to/AkerMCP/Server -c Release --verbosity quiet --nologo
JSON Configuration (for Claude Code config, Cursor, Antigravity, etc):
{
  "mcpServers": {
    "game-engine": {
      "type": "stdio",
      "command": "dotnet",
      "args": [
        "run",
        "--project",
        "C:/absolute/path/to/AkerMCP/Server",
        "-c",
        "Release",
        "--verbosity",
        "quiet",
        "--nologo"
      ]
    }
  }
}
Advanced: Building from Source (For Developers)
If you want to modify AkerMCP or test the included Unity project, you'll need the .NET 8.0+ SDK.
Step 1 — Clone and Build
git clone https://github.com/lorenzo-cambiaghi/AkerMCP.git
cd AkerMCP
dotnet build -c Release
dotnet publish Shared/AkerMcp.Shared.csproj -c Release -o .publish
Step 2 — Unity Plugin Setup
If you are modifying the source code and want to push changes to your own Unity project:
- Copy the
UnityTestProject/Assets/AkerMcpfolder into your own Unity project'sAssets/folder. - Create
Assets/AkerMcp/Plugins/and copy all.dllfiles from.publish/andClient/bin/Release/netstandard2.1/. - Copy the Unity Roslyn Compilers (
Microsoft.CodeAnalysis.dll, etc.) from your Unity Editor installation (.../Editor/Data/MonoBleedingEdge/lib/mono/4.5/) into thePlugins/folder.
If you just want to run the included UnityTestProject, run ./copy-dlls.sh (or copy-dlls.bat on Windows) to automatically build and copy all dependencies.
Packaging a Release
Run build-package.bat (Windows) or ./build-package.sh (Mac/Linux) to automatically compile the DLLs, export the Unity package, and publish the standalone MCP server binaries to the Build/ folder.
Verifying the Connection
Once both the Unity plugin and an AI client are running, you can verify the connection:
- In Unity — the AkerMcp window should show Running (green)
- In the AI client — ask the AI to use the
inspecttool:
"Inspect the scene hierarchy"
You should get back a tree of GameObjects with their components:
Player  [Transform, Rigidbody]
  PlayerCamera  [Transform, Camera]
Enemy_1  [Transform, MeshFilter, MeshRenderer, BoxCollider, Rigidbody]
Enemy_2  [Transform, MeshFilter, MeshRenderer, BoxCollider, Rigidbody]
Ground  [Transform, MeshFilter, MeshRenderer, MeshCollider]
If you see this, everything is working.
MCP Tools
Scene Manipulation
| Tool | Description |
|---|---|
inspect | Return components, properties, methods, and children of a scene object or type |
get_property | Read a property via dot-notation path (e.g. transform.position.x) |
set_property | Write a property — supports primitives, structs, arrays, nested objects |
call_method | Invoke a method on a scene object or a static class method |
query | Find objects by type name, name pattern, tag, or property values |
create | Add a new object to the scene with optional initial properties |
delete | Remove an object from the scene (supports undo) |
select | Select a GameObject in the editor — highlights it in the Hierarchy and Inspector |
get_selection | Get the currently selected object with its components, properties, and children |
Development Workflow
| Tool | Description |
|---|---|
refresh_scripts | Force script recompilation and return errors/warnings immediately |
get_compile_errors | Retrieve compilation errors with file path, line, and column |
get_console_logs | Read engine console entries with level and text filtering |
execute | Run arbitrary C# code in the engine context (Roslyn) |
Visual Verification
| Tool | Description |
|---|---|
take_screenshot | Capture the editor's Game or Scene view and return a JPEG image to the AI |
How take_screenshot works
The tool follows a hybrid capture strategy that prefers quality but always succeeds:
- Engine-internal path (if the adapter implements
IScreenCapture) — captures directly from the render buffer. Works even when the editor window is occluded or partially off-screen. Highest quality. - OS-level fallback (automatic, cross-platform on Windows + macOS) — captures the engine's main window without stealing foreground focus. Works for any C# engine without requiring adapter code. Per-OS implementation is selected at runtime:
- Windows — Win32
PrintWindow(PW_RENDERFULLCONTENT)viauser32.dll - macOS — Quartz
CGWindowListCreateImageviaCoreGraphics.framework+ImageIO.framework. Window discovery: enumerates on-screen windows owned by the engine PID; among those, prefers any whose title contains the engine name (anywhere — matches both "Unity 6000…" and "… Godot Engine") and within that subset picks the largest by area. If no title contains the engine name, falls back to the largest PID-owned window - Linux — not implemented; the engine adapter must implement
IScreenCapture
- Windows — Win32
Output is automatically (cross-platform via ImageSharp):
- Resized to a maximum of 1920px on the longest side
- Re-encoded as JPEG (quality 85)
Typical output size: ~150-400 KB, comfortably under Claude API image limits (~5 MB).
Parameters:
{ "view": "game" }   // default — captures the Game View
{ "view": "scene" }  // captures the active Scene View (Unity)
Example:
→ set_property {"object_path": "/Player", "property_path": "Light.color", "value": {"r":1,"g":0,"b":0,"a":1}}
← Property 'Light.color' set successfully on /Player

→ take_screenshot {"view": "scene"}
← [JPEG image, 1920×1080, 287 KB]   // AI now sees the red light
macOS: Screen Recording permission
On macOS 10.15+, capturing windows from another process requires Screen Recording permission for the binary running the AkerMcp server. This affects only the OS-level fallback path — adapters implementing IScreenCapture (like the Unity adapter) work without any permission grant.
First-time setup:
- The first time the OS-level fallback is invoked, macOS shows a permission prompt for the binary running the server (typically
dotnet). - If you miss the prompt or denied it, open: System Settings → Privacy & Security → Screen Recording
- Add (or enable the toggle for) the binary running AkerMcp:
- If you launch via
dotnet run --project Server→ the entry isdotnet(ordotnet [version]) - If you ship a self-contained build → the entry is your published executable
- If you launch via
- Restart the server. macOS caches the denial decision until the process restarts — granting alone is not enough.
Verification:
# Trigger a screenshot from your AI client. If permission is missing, the tool returns:
#   "macOS denied the screen capture (CGWindowListCreateImage returned NULL)..."
# Follow the steps above and try again after restarting the server.
Why no permission is needed for Unity (and most engines): The Unity adapter implements IScreenCapture using its own Camera/SceneView render buffer. That happens entirely inside the Unity process, so macOS doesn't treat it as cross-process screen capture and no permission is required. Only when no adapter capture exists does AkerMcp fall back to the OS-level path that triggers the permission flow.
Dynamic Code Execution (execute)
The execute tool runs arbitrary C# code inside the Unity Editor using Roslyn (Microsoft.CodeAnalysis.CSharp.Scripting). This is the most powerful tool — it can do anything the Unity Editor API allows.
What it enables:
- Procedural scene generation (spawn 100 objects in a grid, create terrain, etc.)
- Bulk property modifications across many objects
- Asset manipulation (create materials, import textures, modify prefabs)
- Complex queries that go beyond what
querysupports - Editor automation (menu items, build pipeline, custom importers)
- Anything you can do in a Unity Editor script
Built-in globals available in your code:
| Global | Type | Description |
|---|---|---|
selectedObject | GameObject? | Currently selected GameObject in the editor |
Find(name) | GameObject? | Shortcut for GameObject.Find(name) |
FindAll<T>() | T[] | Find all objects of type T |
Create(name) | GameObject | Create a new empty GameObject |
Log(message) | void | Log to the Unity console |
Imported namespaces (no using needed): System, System.Collections.Generic, System.Linq, UnityEngine, UnityEditor
Examples:
// Create a grid of cubes
for (int x = 0; x < 5; x++)
    for (int z = 0; z < 5; z++) {
        var cube = GameObject.CreatePrimitive(PrimitiveType.Cube);
        cube.name = $"Cube_{x}_{z}";
        cube.transform.position = new Vector3(x * 2, 0, z * 2);
    }
// Set all enemies to red
var enemies = FindAll<Renderer>()
    .Where(r => r.gameObject.name.StartsWith("Enemy"))
    .ToArray();
foreach (var r in enemies)
    r.material.color = Color.red;
return $"Colored {enemies.Length} enemies";
// Return scene stats
var objects = FindAll<GameObject>();
var types = objects
    .SelectMany(go => go.GetComponents<Component>())
    .Where(c => c != null)
    .GroupBy(c => c.GetType().Name)
    .Select(g => $"{g.Key}: {g.Count()}")
    .ToArray();
return string.Join("\n", types);
Note: The script state persists between calls — variables defined in one
executecall are available in the next. The evaluator runs on Unity's main thread with full Editor API access.
How property paths work
Properties are accessed via dot-notation paths resolved at runtime through reflection:
transform.position.x          → float
Rigidbody.mass                → float (targets a specific component)
MeshRenderer.material.color   → Color
When a property name is ambiguous (e.g. enabled exists on multiple components), prefix it with the component type: Rigidbody.enabled, MeshRenderer.enabled.
MCP Resources
| URI | Description |
|---|---|
scene://hierarchy | Full scene tree with components listed per object |
project://info | Engine name/version, project path, active scene |
editor://logs | Recent console entries |
editor://compile_status | Compilation status, error/warning counts |
engine://types | Registered engine type names |
Type System
The serializer converts between JSON and .NET types via reflection. It handles:
- Primitives —
int,float,double,bool,string,enum - Structs — any value type, constructed from JSON via field/property matching
- Arrays —
T[]from JSON arrays - Lists —
List<T>from JSON arrays - Dictionaries —
Dictionary<string, T>from JSON objects - Nested types — recursive resolution (e.g.
BoundscontainingVector3fields) - Nullable — automatic unwrap
The Unity adapter registers optimized converters for:
Vector2  Vector3  Vector4  Vector2Int  Vector3Int
Quaternion  Color  Color32  Rect  RectInt
Bounds  BoundsInt  LayerMask
JSON examples:
{ "x": 1.0, "y": 2.0, "z": 3.0 }                                              // Vector3
{ "r": 0.5, "g": 0.0, "b": 1.0, "a": 1.0 }                                    // Color
{ "center": { "x": 0, "y": 0, "z": 0 }, "size": { "x": 10, "y": 10, "z": 10 }} // Bounds
[{ "x": 0, "y": 0, "z": 0 }, { "x": 1, "y": 1, "z": 1 }]                      // Vector3[]
Example Session
→ inspect {"target": "/Player"}
← {
    "typeName": "Rigidbody",
    "path": "/Player",
    "components": [
      {"name": "Transform", "enabled": true},
      {"name": "Rigidbody", "enabled": true}
    ],
    "properties": [
      {"name": "position", "type": "Vector3", "value": {"x":0,"y":1,"z":0}},
      {"name": "Rigidbody.mass", "type": "float", "value": 1.0},
      ...
    ],
    "childNames": ["PlayerCamera"]
  }

→ select {"object_path": "/Player/PlayerCamera"}
← {"selected": true, "path": "/Player/PlayerCamera", "name": "PlayerCamera",
    "components": [{"name":"Transform"}, {"name":"Camera"}]}

→ set_property {
    "object_path": "/Player",
    "property_path": "position",
    "value": {"x": 10, "y": 0, "z": 5}
  }
← Property 'position' set successfully on /Player

→ query {"type_filter": "Camera"}
← [{"path": "/Player/PlayerCamera", "type": "Camera", "name": "PlayerCamera"}]

→ refresh_scripts {}
← Recompilation requested. Status: idle
  Last compile: 14:32:05
  Result: SUCCESS
  No errors or warnings.

→ get_console_logs {"level_filter": "error", "count": 10}
← (No matching log entries)
Architecture
                  ┌──────────────────────┐
                  │  LLM (Claude, etc.)  │
                  └──────────┬───────────┘
                             │ JSON-RPC 2.0 / stdio
                  ┌──────────▼───────────┐
                  │    AkerMCP Server    │   .NET 8 console process
                  │   14 MCP tools       │
                  │    5 MCP resources   │
                  └──────────┬───────────┘
                             │ Named Pipe + MessagePack
                  ┌──────────▼───────────┐
                  │   Engine Plugin      │   runs inside Unity / Godot / Stride / Flax
                  │   ISceneGraph impl   │
                  └──────────────────────┘
| Project | Target | Description |
|---|---|---|
AkerMcp.Shared | netstandard2.1 | Protocol models, engine abstractions, reflection engine, serialization, IPC |
AkerMcp.Server | net8.0 | MCP server — JSON-RPC over stdio, routes tool calls to the engine plugin |
AkerMcp.Client | netstandard2.1 | Plugin base class — runs inside the engine, handles IPC and main-thread dispatch |
How it works
- The engine plugin starts a named-pipe server and writes a lock file to the system temp directory.
- The MCP server scans for lock files, connects to the pipe, and begins forwarding tool calls.
- The LLM sends JSON-RPC requests over stdio. The server forwards them to the engine plugin via MessagePack IPC and returns results as JSON.
- The engine plugin dispatches requests to the main thread, executes reflection-based operations through
ISceneGraph/ISceneNode, and returns results.
Property paths like transform.position.x are resolved at runtime by PropertyPathResolver, which walks the object graph via cached reflection metadata. Struct value-type propagation is handled automatically.
Project structure
AkerMCP/
├── AkerMcp.sln
├── Shared/                              AkerMcp.Shared (netstandard2.1)
│   ├── Protocol/                        JSON-RPC and MCP message models
│   ├── Abstraction/                     Engine-agnostic interfaces
│   ├── Reflection/                      PropertyPathResolver, inspector, cache
│   ├── Serialization/                   GenericSerializer, TypeRegistry
│   └── Ipc/                             Named pipe channel, binary framing
├── Server/                              AkerMcp.Server (net8.0 console app)
│   ├── McpServer.cs                     JSON-RPC dispatcher, MCP lifecycle
│   ├── ToolRegistry.cs                  14 generic tool definitions
│   ├── ResourceRegistry.cs              5 resource definitions
│   ├── EngineConnection.cs              IPC client to engine plugin
│   ├── StdioTransport.cs                stdin/stdout transport
│   ├── ImageProcessor.cs                Resize + JPEG normalization (cross-platform via ImageSharp)
│   └── Platform/                        OS-level window capture
│       ├── IPlatformScreenCapture.cs    Common interface
│       ├── PlatformScreenCapture.cs     Runtime OS-based factory
│       ├── Windows/
│       │   └── WindowsScreenCapture.cs  Win32 PrintWindow + GDI+
│       └── Mac/
│           └── MacScreenCapture.cs      Quartz CGWindowListCreateImage + ImageIO P/Invoke
├── Client/                              AkerMcp.Client (netstandard2.1)
│   ├── EnginePluginBase.cs             Abstract base for adapters
│   ├── IpcRequestHandler.cs            Request routing and execution
│   ├── PluginDiscovery.cs              Lock-file based auto-discovery
│   ├── MainThreadDispatcherBase.cs     Thread-safe queue with TCS pattern
│   └── ClientConfiguration.cs          Client-side settings
└── UnityTestProject/                    Unity 6 test project
    └── Assets/AkerMcp/                  Unity adapter implementation
        ├── UnitySceneGraph.cs           Scene traversal and node creation
        ├── UnitySceneNode.cs            Reflection wrapper for GameObjects
        ├── UnityTypeRegistration.cs     MessagePack types and aliases
        └── Editor/                      Editor-only tooling
            ├── DynamicEvaluator.cs      Roslyn-powered C# execution engine
            ├── McpEditorWindow.cs       Unity Editor UI for MCP server
            ├── UnityCompilationSupport.cs Script compilation tools
            ├── UnityEditorContext.cs    Active selection and console logs
            ├── UnityMainThreadDispatcher.cs Unity main thread marshalling
            ├── UnityScreenCapture.cs    Game/Scene view render-buffer capture
            └── UnityMcpPlugin.cs        Plugin entry point
Writing an Engine Adapter
To support a new engine (e.g. Godot, Stride, Flax), subclass EnginePluginBase and implement the required interfaces:
public class MyEnginePlugin : EnginePluginBase
{
    // Required
    protected override ISceneGraph CreateSceneGraph() => new MySceneGraph();
    protected override IEngineCapabilities CreateCapabilities() => new MyCapabilities();
    protected override IMainThreadDispatcher CreateDispatcher() => new MyDispatcher();

    // Optional
    protected override IEditorContext? CreateEditorContext() => new MyEditorContext();
    protected override IAssetManager? CreateAssetManager() => null;
    protected override ICompilationSupport? CreateCompilationSupport() => new MyCompilationSupport();
    protected override IScreenCapture? CreateScreenCapture() => new MyScreenCapture();

    protected override void Log(string message) { /* ... */ }
    protected override void LogError(string message) { /* ... */ }
}
| Interface | Purpose | Required |
|---|---|---|
ISceneGraph | Scene tree traversal, create/delete, query | Yes |
ISceneNode | Property get/set, method invocation, component listing | Yes |
IEngineCapabilities | Type resolution, engine metadata | Yes |
IMainThreadDispatcher | Marshal actions to the engine's main thread | Yes |
IEditorContext | Selection, scene management, console logs | No |
IAssetManager | Asset search, load, save, delete | No |
ICompilationSupport | Script recompilation, error retrieval | No |
IScreenCapture | Engine-internal render-buffer capture (Game/Scene view) | No — falls back to OS-level capture on Windows (PrintWindow) and macOS (Quartz). On Linux, this interface is required |
Tip for the macOS OS-level fallback:
IEngineCapabilities.EngineNameis used as a window-title preference signal — the macOS capture path prefers PID-owned windows whose title contains this string (anywhere in the title) to disambiguate the editor's main window from inspector/floating panels. The match is case-insensitive and works for both prefix-style titles (Unity:"Unity 6000.x …") and suffix-style titles (Godot:"Scene - Project - Godot Engine"). If no window matches, the largest PID-owned window is used as a fallback, so even a non-matchingEngineNamewon't break the capture.
Register custom type converters for engine-specific structs:
TypeRegistry.Instance.RegisterCustomSerializer<Vector3>(
    v => new Dictionary<string, object?> { ["x"] = v.x, ["y"] = v.y, ["z"] = v.z },
    d => new Vector3(F(d, "x"), F(d, "y"), F(d, "z"))
);
AI Integration Rules
AkerMCP embeds comprehensive usage instructions directly into each tool's description served via the MCP protocol. This means any AI client (Claude, Cursor, Copilot, Antigravity) automatically learns how to use all 14 tools correctly — including property path syntax, the Inspect → Modify → Verify workflow, Roslyn execution globals, compilation verification, and visual verification via screenshots — with zero configuration.
Optional: Boost with a rules file
For even better results, you can add a rules file to your project root. This reinforces the built-in instructions and gives the AI additional context about common workflows and anti-patterns.
| Platform | File | Scope |
|---|---|---|
| Claude Code | CLAUDE.md (project root) | Per-project |
| Antigravity | AGENTS.md (project root) | Per-project |
| Cursor | .cursor/rules/AkerMCP.md | Per-project |
| Cross-tool | AGENTS.md (project root) | Works with most clients |
Recommended: Use
AGENTS.mdin your project root. It's the most widely supported convention.
Rules template
Copy everything inside the block below into your rules file:
<agent_instructions>

#### AkerMCP — AI Integration Rules

You have access to a Unity (or Godot, Stride, Flax) game engine via the `game-engine` MCP server. This gives you 14 tools to inspect, query, modify, script, and visually verify the active scene — all from the editor.

#### Available Tools (quick reference)

| Tool | Use when... |
|------|-------------|
| `inspect` | You need to see what's on a GameObject — components, properties, children |
| `get_property` | You know the exact path and want a single value |
| `set_property` | You want to change one property with undo support |
| `call_method` | You need to invoke a method (e.g. `SetActive`, `AddForce`) |
| `query` | You need to find objects by type, name pattern, or tag |
| `create` | You need to add a new GameObject to the scene |
| `delete` | You need to remove a GameObject (destructive, has undo) |
| `select` | You want to highlight an object in Unity's Hierarchy/Inspector |
| `get_selection` | You want to know what the user currently has selected |
| `refresh_scripts` | You just wrote or modified a `.cs` file and need to trigger recompilation |
| `get_compile_errors` | You need to check if scripts compiled successfully |
| `get_console_logs` | You need to read runtime errors, warnings, or debug output |
| `execute` | You need to run arbitrary C# code (procedural generation, bulk ops, complex logic) |
| `take_screenshot` | You need to **see** the result of a change (placement, materials, lighting, UI) |

#### Core Workflow: Inspect → Modify → Verify

Always follow this pattern:

1. **Inspect first.** Before modifying anything, call `inspect` to see the object's components, properties, and current values. Never guess.
2. **Modify.** Use `set_property` for single changes, `execute` for complex operations.
3. **Verify.** Call `get_property` or `inspect` again to confirm the change took effect. Check `get_console_logs` if something seems wrong.
4. **Visually verify (when relevant).** For changes that affect what the user *sees* — placement, materials, lighting, UI layout, scale — call `take_screenshot` after the change to confirm the result looks right. This catches problems that property values alone cannot reveal (e.g. an object placed inside another, a material that compiled but renders pink, a UI element clipped off-screen).
Bad: set_property "/Player" "mass" 5 ← "mass" might not resolve (it's on Rigidbody) Good: inspect "/Player" → see "Rigidbody.mass" exists → set_property "/Player" "Rigidbody.mass" 5
#### Property Path Syntax

Properties use **dot-notation** resolved via reflection:
position → Transform.position (Transform is searched first) position.x → float Rigidbody.mass → targets the Rigidbody component specifically Rigidbody.useGravity → bool MeshRenderer.material.color → Color
**Rules:**
- Transform properties (`position`, `rotation`, `localScale`, `eulerAngles`) don't need a prefix
- Other components need the type prefix: `Rigidbody.mass`, `Camera.fieldOfView`, `Light.intensity`
- Nested properties work: `MeshRenderer.material.color.r`
- Array indexing works: `mesh.vertices[0]`

**Structs are passed as JSON objects:**
```json
{"x": 1.0, "y": 2.0, "z": 3.0}           // Vector3
{"r": 1.0, "g": 0.0, "b": 0.0, "a": 1.0} // Color
When to Use execute vs Other Tools
| Scenario | Use |
|---|---|
| Change one property | set_property |
| Read one value | get_property |
| Find objects | query |
| Create one object | create |
| Modify 10+ objects in a loop | execute |
| Generate procedural content | execute |
| Access Editor API (AssetDatabase, Undo groups, etc.) | execute |
| Complex conditional logic | execute |
| Create materials, shaders, ScriptableObjects | execute |
| Confirm a visual change actually looks right | take_screenshot |
| Show the user what the scene currently looks like | take_screenshot |
Writing execute Scripts
Available globals (no setup needed):
selectedObject              // Currently selected GameObject (or null)
Find("Player")              // GameObject.Find shortcut
FindAll<Rigidbody>()        // Find all components of a type
Create("MyObject")          // Create empty GameObject
Log("message")              // Debug.Log shortcut
Pre-imported namespaces: System, System.Collections.Generic, System.Linq, UnityEngine, UnityEditor
State persists between calls. Variables you define in one execute are available in the next:
// Call 1
var player = Find("Player");
// Call 2
return player.transform.position;  // still accessible
Return values are sent back to you. Always return a meaningful result:
// Good — returns useful info
var count = FindAll<Rigidbody>().Length;
return $"Found {count} rigidbodies";

// Bad — no feedback
FindAll<Rigidbody>();  // returns null, you won't know the result
Timeout: Default is 5 seconds. Pass timeout_ms for longer operations.
Visual Verification with take_screenshot
Use it whenever the user asks "how does it look?", "did it work?", or after making any change that has a visual outcome:
| Situation | Should you screenshot? |
|---|---|
| Moved/created/deleted an object | ✅ Yes — confirm placement |
| Changed a material, color, or texture | ✅ Yes — colors can fail silently (pink fallback shaders) |
| Modified lighting | ✅ Yes — intensity/color changes are hard to predict numerically |
| Modified UI layout | ✅ Yes — anchoring/scaling bugs are visual-only |
| Spawned procedural content | ✅ Yes — verify the generation looks reasonable |
| Changed a non-visual property (mass, tag, name, layer) | ❌ No — get_property is enough |
| Wrote a script | ❌ No — use get_compile_errors instead |
Parameters:
{ "view": "game" }   // default — Game View, what the player sees
{ "view": "scene" }  // Scene View, useful for inspecting the full editor with gizmos
Output is a JPEG (~150-400 KB, max 1920px). You'll receive it as an image content block — read it like any other image.
Pattern: change → screenshot → react
→ execute "for (int i = 0; i < 50; i++) { var t = GameObject.CreatePrimitive(PrimitiveType.Cube); t.transform.position = new Vector3(Random.Range(-20,20), 0, Random.Range(-20,20)); t.name = $\"Tree_{i}\"; } return \"spawned 50\";"
← spawned 50

→ take_screenshot {"view": "scene"}
← [JPEG image]
   ← AI sees: cubes are clustered too tightly in one corner — distribution looks wrong
   → Fixes the script and re-runs.
Don't screenshot for every micro-change. It's not free — the AI client renders the image and consumes context. Use it at the end of a logical edit, not after each set_property in a sequence.
After Writing or Modifying C# Scripts
Whenever you create or edit a .cs file in the Unity project:
- Call
refresh_scripts— this forces Unity to recompile - Call
get_compile_errors— check for errors - If errors exist, fix them and repeat
→ refresh_scripts {}
← Recompilation requested. Result: FAILED
  === ERRORS (1) ===
  Assets/Scripts/Player.cs(15,9): error CS1002: ; expected

→ (fix the file)

→ refresh_scripts {}
← Result: SUCCESS. No errors or warnings.
Never assume a script change compiled successfully. Always verify.
Scene Navigation
Paths use forward slashes from the scene root:
/Player
/Player/PlayerCamera
/Environment/Trees/Oak_01
To find objects when you don't know the path:
query {"name_pattern": "Player*"}— glob searchquery {"type_filter": "Camera"}— by component typequery {"tag": "Enemy"}— by tag
To explore the full scene:
- Read the
scene://hierarchyresource — returns the complete tree with components - Or call
inspecton root objects
Anti-Patterns
| Don't | Do instead |
|---|---|
| Guess property names | inspect the object first |
| Modify without inspecting | Inspect → modify → verify |
Use execute for one property change | set_property (supports undo) |
| Ignore compile errors after writing scripts | refresh_scripts → get_compile_errors |
| Assume paths are case-insensitive | They're case-sensitive on the engine side |
| Create complex objects one property at a time | Use execute with a single script |
Forget to return values in execute | Always return a string describing what happened |
| Screenshot after every micro-change | Screenshot once at the end of a logical edit |
| Trust property values alone for visual changes | take_screenshot to confirm the actual rendered result |
Error Recovery
If a tool call fails:
- Read the error message — it usually tells you exactly what's wrong
- Inspect the target — the object may not exist, or the property name may be different
- Check the console —
get_console_logs {"level_filter": "error"}shows runtime errors - For compile errors —
get_compile_errorsshows the exact file, line, and column
</agent_instructions>
</details>

---

## Troubleshooting

**The server says "No engine plugin discovered"**

The Unity plugin must be started *before* the MCP server. Open **Window → AkerMcp** in Unity and click **Start** first.

**Unity shows DLL loading errors**

Make sure you copied *all* DLLs from the `.publish/` folder, including `System.Text.Json.dll`. Unity does not ship this library by default.

**Property not found on component**

Prefix the property with the component type name: `Rigidbody.mass` instead of just `mass`. This disambiguates when multiple components share property names.

**The first server start is slow**

`dotnet run` compiles the server on first launch. Subsequent starts are fast. You can also use `dotnet build -c Release` ahead of time, then run the compiled binary directly:

```bash
./Server/bin/Release/net8.0/AkerMcp.Server
Connection drops after Unity recompiles scripts
Domain reload in Unity tears down the plugin to safely release file locks. Re-click Start in the AkerMcp window after a recompile. The MCP server features an infinite background retry loop and will automatically detect the new instance and reconnect—you do not need to restart the server.
macOS: take_screenshot returns "macOS denied the screen capture"
Only happens when the OS-level fallback is used (engine adapter doesn't implement IScreenCapture). Open System Settings → Privacy & Security → Screen Recording, enable the entry for the binary running the server (typically dotnet), then restart the server — macOS caches the denial decision until the process restarts. See macOS: Screen Recording permission for the full procedure.
macOS: take_screenshot returns "No on-screen window found for PID"
Only happens with the OS-level fallback. The engine's main window cannot be located via title prefix. Verify that IEngineCapabilities.EngineName in your adapter matches the actual editor window title prefix (e.g. "Unity" for Unity Editor). The match is case-insensitive but must be a prefix.
Unity says "Opening file failed: Access is denied"
If you downloaded the repository as a ZIP or cloned it on Windows, Unity might complain about .asset or .meta files being read-only. To fix this:
- Right-click the
UnityTestProjectfolder in Windows Explorer. - Go to Properties.
- Uncheck the Read-only box and click Apply (apply to all folders, subfolders, and files).
Alternatively, open Command Prompt and run:
attrib -R "UnityTestProject\*.*" /S /D