
Tempo Filler MCP Server
lbr88/tempo-filler-mcp-server
Gerencie worklogs Tempo no JIRA com IA via MCP
Ver no GitHubServidor MCP para gerenciar worklogs do Tempo integrado ao JIRA, suportando Server/Data Center e Cloud. Permite recuperar, criar, atualizar, deletar e gerenciar em massa entradas de tempo com interfaces visuais (timesheet grid e calendário de agendamento).
Instalação
npx convez-ai lbr88/tempo-filler-mcp-server1 comando no terminal: detecta o formato do repositório (marketplace ou plugin avulso) e instala via Claude Code. Requer Node 18+ e o Claude Code instalado.
Métricas
Casos de uso
- Consultar e registrar horas trabalhadas no JIRA Tempo
- Visualizar timesheets e cobertura de horas em tabelas interativas
- Gerenciar agendamentos e dias úteis com calendário visual
- Automatizar preenchimento em massa de worklogs com assistentes IA
Veredito

Ferramenta madura e bem implementada para quem usa Tempo/JIRA. A integração MCP com interfaces visuais (timesheet grid e calendário) torna a experiência mais intuitiva que APIs brutas. Recomendado para equipes que precisam automatizar gestão de horas com Claude Desktop ou VS Code.
README
A tradução para o português deste README ainda está na fila.
⏰ Tempo Filler MCP Server



A Model Context Protocol (MCP) server for managing Tempo worklogs in JIRA. This server supports both Jira Server/Data Center and Jira Cloud with Tempo Cloud, enabling AI assistants to retrieve, create, update, delete, and bulk-manage time entries.
🖼️ Visual UI with MCP Apps
TempoFiller now supports MCP Apps - rendering rich visual interfaces directly in compatible AI chat clients like Claude Desktop. Instead of just text responses, you get interactive calendar and timesheet views!
Timesheet Grid View
Ask for your logged hours and see them in a familiar Tempo-style pivot table:
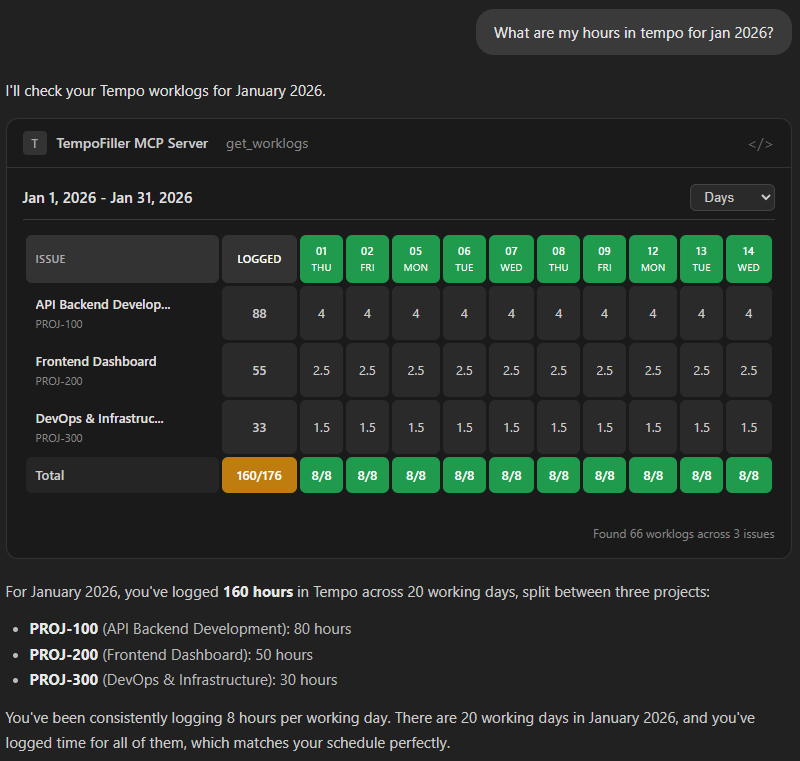
Features:
- Issues as rows, time periods as columns
- Coverage-aware coloring (green = full, yellow = under, red = gap)
- Zoom toggle: Days / Weeks / Months
- Total row with logged/required hours comparison
Schedule Calendar View
Check your work schedule with a visual calendar:
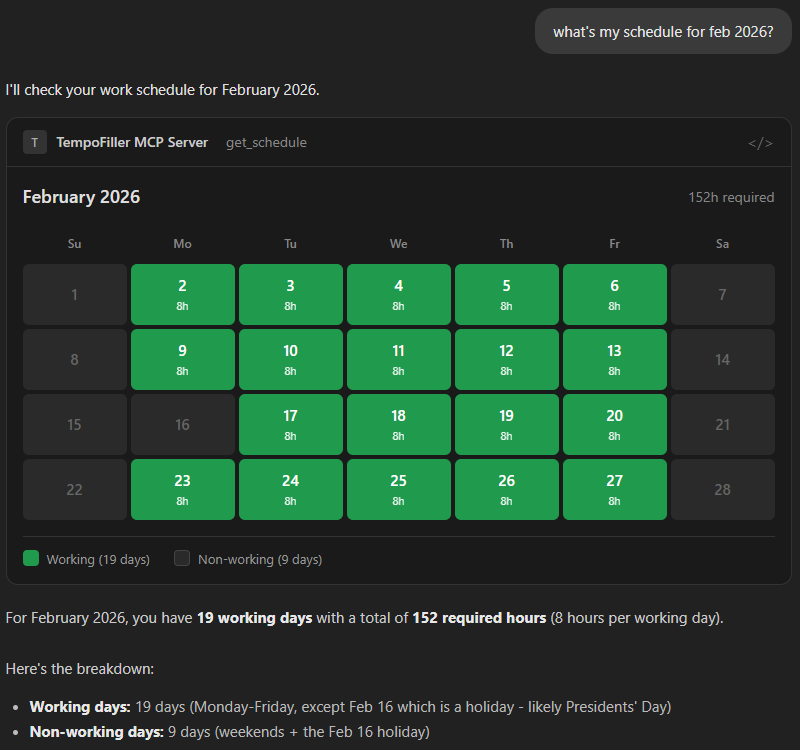
Features:
- Month grid with working days (green) and non-working days (gray)
- Shows required hours per day
- Holiday and weekend awareness
- Summary with total working days and required hours
Note: Visual UIs render in MCP Apps-compatible hosts (Claude Desktop, VS Code). CLI hosts receive the same structured data, which the AI formats conversationally.
🚀 Quick Start
Install in VS Code
The install button configures the Server/Data Center mode. Jira Cloud users should use the manual Cloud configuration below.
Install in Claude Desktop

- Click the button above to download the desktop extension (
.dxtfile) - Open Claude Desktop and go to Settings → Extensions
- Drag the downloaded
.dxtfile into the extensions panel to install- If dragging doesn't work: Click Advanced Settings → Install Extension and select the downloaded file
- Fill in the Tempo Base URL and PAT in the environment variables section
- Don't forget to enable it!
The desktop extension currently prompts for Server/Data Center credentials. Jira Cloud users should use the manual Cloud configuration below.
Install from this repository locally
Use this when testing this fork or unpublished local changes. The VS Code button, Claude Desktop extension link, and npx examples use the published upstream package; a local MCP install should point directly at the built server file.
-
Clone and build this repository:
git clone https://github.com/lbr88/tempo-filler-mcp-server.git cd tempo-filler-mcp-server npm install npm run build pwd -
Use the absolute path from
pwdin your MCP config.Jira Server/Data Center:
{
  "mcpServers": {
    "tempo-filler-local": {
      "command": "node",
      "args": ["/absolute/path/to/tempo-filler-mcp-server/dist/index.js"],
      "env": {
        "TEMPO_BASE_URL": "https://jira.company.com",
        "TEMPO_PAT": "your-jira-personal-access-token"
      }
    }
  }
}
Jira Cloud + Tempo Cloud:
{
  "mcpServers": {
    "tempo-filler-local": {
      "command": "node",
      "args": ["/absolute/path/to/tempo-filler-mcp-server/dist/index.js"],
      "env": {
        "JIRA_BASE_URL": "https://your-site.atlassian.net",
        "JIRA_EMAIL": "you@example.com",
        "JIRA_API_TOKEN": "your-atlassian-api-token",
        "TEMPO_TOKEN": "your-tempo-api-token"
      }
    }
  }
}
For Claude Desktop, add the server object under mcpServers in claude_desktop_config.json. For VS Code, add the same server object to your MCP configuration.
Install Manually on your favorite AI Assistant
Jira Server/Data Center
{
  "mcpServers": {
    "tempo-filler": {
      "command": "npx",
      "args": ["@tranzact/tempo-filler-mcp-server"],
      "env": {
        "TEMPO_BASE_URL": "https://jira.company.com",
        "TEMPO_PAT": "your-jira-personal-access-token"
      }
    }
  }
}
Jira Cloud + Tempo Cloud
{
  "mcpServers": {
    "tempo-filler": {
      "command": "npx",
      "args": ["@tranzact/tempo-filler-mcp-server"],
      "env": {
        "JIRA_BASE_URL": "https://your-site.atlassian.net",
        "JIRA_EMAIL": "you@example.com",
        "JIRA_API_TOKEN": "your-atlassian-api-token",
        "TEMPO_TOKEN": "your-tempo-api-token"
      }
    }
  }
}
Cloud mode is selected automatically when JIRA_BASE_URL, JIRA_EMAIL, JIRA_API_TOKEN, and TEMPO_TOKEN are all present. Tempo Cloud API requests default to https://api.tempo.io; set TEMPO_BASE_URL only if you need to override that endpoint.
💬 Real Usage Example
Here's an actual conversation showing how natural and powerful the interaction can be:
👤 User:
fill my october hours with the same project from september
🤖 AI Assistant:
I'll help you fill your October hours with the same project from September. Let me first check your September worklogs to understand the pattern, then fill October accordingly.
🔧 mcp_tempo-filler-_get_worklogs({
  "startDate": "2025-09-01",
  "endDate": "2025-09-30"
})
Perfect! I can see you worked on PROJ-1234 (Tempo MCP Server) for 200 hours in September. Now let me get your October work schedule to see which days need to be filled.
🔧 mcp_tempo-filler-_get_schedule({
  "startDate": "2025-10-01",
  "endDate": "2025-10-31"
})
Excellent! I now have all the information needed. Let me fill all 23 working days in October with the Tempo MCP Server project using 8 hours per working day.
🔧 mcp_tempo-filler-_bulk_post_worklogs({
  "billable": true,
  "worklogs": [
    {"issueKey": "PROJ-1234", "hours": 8, "date": "2025-10-01", "description": "Tempo MCP Server development"},
    {"issueKey": "PROJ-1234", "hours": 8, "date": "2025-10-02", "description": "Tempo MCP Server development"},
    // ... 21 more entries for all working days
  ]
})
✅ October Hours Filled Successfully
- Project: PROJ-1234 (Tempo MCP Server)
- Total Hours: 184 hours across 23 working days
- Hours per Day: 8 hours (matching your standard work schedule)
- Status: All entries created successfully with no failures
Tool Calls Made:
get_worklogs- Retrieved September pattern (PROJ-1234, 200h)get_schedule- Found 23 working days in October (184h capacity)bulk_post_worklogs- Created 23 entries in one operationYour October timesheet is now complete and matches the same project pattern you used in September!
🎯 What Happened Here:
- 3 Tool Calls:
get_worklogs→get_schedule→bulk_post_worklogs - Smart Pattern Recognition: Automatically identified PROJ-1234 from September data
- Schedule Awareness: Only filled working days, skipped weekends automatically
- Bulk Operations: Created 23 worklog entries in a single API call
- Error-Free Execution: 100% success rate with proper validation
- Natural Language: No need to remember issue keys, dates, or tool syntax
⏱️ Time Saved: This single natural language request triggered 3 MCP tool calls and replaced hours of manual timesheet entry!
🛠️ How This Was Built
This MCP server was built in just 3 hours using AI-powered development tools, demonstrating the power of modern AI-assisted coding:
Development Timeline
-
Specification Phase
- Created the complete technical specification using GitHub Copilot with Claude Sonnet 4
- Defined all API endpoints, data structures, and tool interfaces
- Refined requirements through iterative conversation
-
Implementation Phase
- Used VS Code with Claude Code to one-shot the entire implementation
- Generated complete TypeScript codebase, tool implementations, and client logic
- Implemented all core functionality in a single AI-assisted session
-
Refinement Phase
- Switched back to GitHub Copilot with Claude Sonnet 4 after hitting usage limits in Claude Code
- Fixed API payload formatting and authentication issues
- Debugged and polished the Tempo API integration
Key Success Factors
- Clear specification first: Having a detailed spec enabled effective one-shot implementation
- AI tool synergy: Different AI tools excelled at different phases of development
- Iterative refinement: Quick feedback loops with AI assistants for debugging
This project showcases how AI-powered development can dramatically accelerate the creation of robust, production-ready tools.
✨ Features
- Get Worklogs: Retrieve worklogs for users with date range and issue filtering
- Create Worklogs: Add single worklog entries with automatic issue resolution
- Bulk Operations: Create multiple worklog entries efficiently using concurrent processing
- Delete Worklogs: Remove existing worklog entries
- Get Schedule: Retrieve work schedule with working/non-working day information
- Visual UIs: Rich calendar and timesheet grid views via MCP Apps
- Resource Access: Browse worklog data and recent issues
- Prompt Templates: Generate analysis prompts for worklog data
📦 Installation
Prerequisites
- Node.js (version 18 or higher)
- A JIRA instance with Tempo Timesheets installed, or Jira Cloud with Tempo Cloud
- Credentials for your deployment mode:
- Server/Data Center: a JIRA Personal Access Token
- Cloud: a Jira API token plus a Tempo API token
NPX (Recommended)
The easiest way to use the server is with npx - no installation required:
npx @tranzact/tempo-filler-mcp-server
Just configure your AI assistant to use npx @tranzact/tempo-filler-mcp-server as the command.
Development Setup (Source)
For development or customization:
-
Clone the repository:
git clone https://github.com/lbr88/tempo-filler-mcp-server.git cd tempo-filler-mcp-server -
Install dependencies and build:
npm install && npm run build
⚙️ Configuration
The server supports two authentication modes. Use one complete set of variables.
Jira Server/Data Center
Use this mode when Tempo is installed on the same Jira Server/Data Center instance.
Required:
TEMPO_BASE_URL: Your Jira instance URL (for example,https://jira.company.com)TEMPO_PAT: Jira Personal Access Token used as a Bearer token
Jira Cloud + Tempo Cloud
Use this mode when your Jira site is hosted at *.atlassian.net and Tempo uses the Tempo Cloud API.
Required:
JIRA_BASE_URL: Your Jira Cloud site URL (for example,https://your-site.atlassian.net)JIRA_EMAIL: Email address for the Atlassian accountJIRA_API_TOKEN: Atlassian API token for Jira REST API accessTEMPO_TOKEN: Tempo API token for Tempo Cloud API access
Optional:
TEMPO_BASE_URL: Tempo API base URL. Defaults tohttps://api.tempo.io.
Alternative Atlassian-style names are also accepted: ATLASSIAN_URL, ATLASSIAN_EMAIL, and ATLASSIAN_API_KEY. TEMPO_PAT can be used instead of TEMPO_TOKEN, but TEMPO_TOKEN is clearer for Cloud setups.
Shared Optional Environment Variables
TEMPO_DEFAULT_HOURS: Default hours per workday (default: 8)
Creating Credentials
Server/Data Center PAT
Create this token in your Jira Server/Data Center profile. Jira Personal Access Tokens are available in Jira 8.14+.
- Log into your Jira Server/Data Center instance.
- Open your user profile menu.
- Go to Profile → Personal Access Tokens.
- Select Create token.
- Give it a clear name, such as
Tempo MCP Server. - Set an expiry date that matches your security policy.
- Create the token and copy it immediately.
- Use the copied value as
TEMPO_PAT.
The token must belong to a user who can view issues, view worklogs, create worklogs, update worklogs, delete worklogs, and view schedule information in Tempo.
Cloud Tokens
Cloud mode needs two different tokens: one Atlassian token for Jira issue/user lookups, and one Tempo token for Tempo worklog and schedule APIs.
Create the Jira Cloud API token:
- Go to Atlassian API tokens.
- Select Create API token or Create API token with scopes.
- Name it clearly, such as
Tempo MCP Server - Jira. - Set an expiry date.
- If you use scoped tokens, grant Jira read access for issues and users. The server uses Jira to resolve issue keys and the current user; Tempo worklog writes use the Tempo token.
- Create the token and copy it immediately. Atlassian only shows the token once.
- Use the token as
JIRA_API_TOKEN. - Use the same Atlassian account email as
JIRA_EMAIL.
Create the Tempo Cloud API token:
- Open your Jira Cloud site.
- Open Tempo, then go to Settings.
- Under Data Access, select API Integration.
- Select New Token.
- Name it clearly, such as
Tempo MCP Server. - Set an expiry date.
- Grant the access needed by the tools you plan to use:
- Worklogs: manage access for
get_worklogs,post_worklog,bulk_post_worklogs,update_worklog, anddelete_worklog. - Schemes / User Schedule: view access for
get_schedule.
- Worklogs: manage access for
- Confirm and copy the token immediately. Tempo only shows the token when it is created.
- Use the token as
TEMPO_TOKEN.
🛠️ Available Tools
1. get_worklogs - Retrieve Time Logs
Retrieve worklogs for a date range with optional filtering. In MCP Apps-compatible hosts, displays an interactive timesheet grid.
Parameters:
startDate(string): Start date in YYYY-MM-DD formatendDate(string, optional): End date, defaults to startDateissueKey(string, optional): Filter by specific issue key
Visual Output (MCP Apps):
Example Usage:
"Get my July hours"
→ Returns: Total: 184h (23 entries)
          • PROJ-1234: 184.0h (23 entries)

"Show me my worklogs for PROJ-1234 in July"
→ Filters results to specific issue
2. post_worklog - Log Single Entry
Create a new worklog entry for a specific issue and date.
Parameters:
issueKey(string): JIRA issue key (e.g., "PROJ-1234")hours(number): Hours worked (decimal, 0.1-24)startDate(string): Date in YYYY-MM-DD formatendDate(string, optional): End date for multi-day entriesbillable(boolean, optional): Whether time is billable (default: true)description(string, optional): Work description
Example Usage:
"Log 8 hours to PROJ-1234 for July 10th"
→ Returns: ✅ Worklog Created Successfully
          Issue: PROJ-1234 - Example Project Task
          Hours: 8h
          Date: 2025-07-10
          Worklog ID: 1211549
3. bulk_post_worklogs - Create Multiple Entries
Create multiple worklog entries efficiently with concurrent processing.
Parameters:
worklogs(array): Array of worklog objects:issueKey(string): JIRA issue keyhours(number): Hours workeddate(string): Date in YYYY-MM-DD formatdescription(string, optional): Work description
billable(boolean, optional): Whether time is billable for all entries
Example Usage:
"Post 8 hours a day every weekday from July 11 to 15 on PROJ-1234"
→ Returns: ✅ Bulk Worklog Creation Started
          Processing 3 worklog entries...
          ✅ Successful: 3
          ❌ Failed: 0
          📊 Total Hours: 24

"Fill all weekdays in July with 8 hours on PROJ-1234"
→ Creates 23 entries for all weekdays in the month
4. delete_worklog - Remove Entry
Delete an existing worklog entry by ID.
Parameters:
worklogId(string): Tempo worklog ID to delete
Example Usage:
"Delete worklog with ID 1211547"
→ Removes the specified worklog entry
5. get_schedule - Retrieve Work Schedule
Retrieve work schedule information showing working days, non-working days, and expected hours per day. In MCP Apps-compatible hosts, displays an interactive calendar view.
Parameters:
startDate(string): Start date in YYYY-MM-DD formatendDate(string, optional): End date, defaults to startDate
Visual Output (MCP Apps):
Example Usage:
"What's my work schedule for October 2025?"
→ Returns: ## Work Schedule (2025-10-01 to 2025-10-31)

          **Period Summary:**
          - Total Days: 31
          - Working Days: 23
          - Non-Working Days: 8
          - Total Required Hours: 184h

"Show me working days this week"
→ Returns schedule for current week with working/non-working day breakdown
💡 Integration Tip: Use this tool before bulk worklog operations to identify working days and avoid logging time on weekends/holidays.
🌎 Real-World Usage Examples
Based on successful implementation, here are practical scenarios:
Daily Time Logging
# Using VS Code with GitHub Copilot:
User: "Log 8 hours on PROJ-1234 for today"
AI: ✅ Worklog Created Successfully
    Issue: PROJ-1234 - Example Project Task
    Hours: 8h
    Date: 2025-08-01
    Worklog ID: 1211550
    Time Spent: 1d
Schedule-First Bulk Time Filling
# RECOMMENDED: Check schedule first, then create entries:
User: "Check my October schedule, then fill all working days with 8 hours on PROJ-1234"
AI: ## Work Schedule (2025-10-01 to 2025-10-31)
    **Period Summary:**
    - Working Days: 23
    - Non-Working Days: 8
    - Total Required Hours: 184h

    ✅ Bulk Worklog Creation Started
    Processing 23 worklog entries (working days only)...
    ✅ Successful: 23
    ❌ Failed: 0
    📊 Total Hours: 184
Monthly Time Filling (Legacy)
# Direct bulk operation (may include non-working days):
User: "Fill all weekdays in July with 8 hours on PROJ-1234"
AI: ✅ Bulk Worklog Creation Started
    Processing 23 worklog entries...
    ✅ Successful: 23
    ❌ Failed: 0
    📊 Total Hours: 184
Schedule-Aware Planning
# Smart time planning workflow:
User: "What's my capacity this month and how should I distribute my time?"
AI: ## Work Schedule (2025-10-01 to 2025-10-31)
    - Working Days: 23
    - Total Required Hours: 184h
    - Average Daily Hours: 8h

    **💡 Next Steps - Schedule-Aware Time Logging:**
    - Total capacity is 184h across 23 working days
    - Example: "Fill all working days shown above with 8 hours on PROJ-1234"
Time Tracking Analysis
# Monthly summary:
User: "Get my July hours"
AI: 📊 Total Hours: 184 hours (23 entries)

    Breakdown by issue:
    • PROJ-1234: 184.0h (23 entries)

    Daily pattern: 8 hours per weekday
    Completion: 100% (all weekdays filled)
🤖 Development
Project Structure
src/
├── index.ts              # Main MCP server entry point (stdio transport)
├── http-server.ts        # HTTP transport server (development/testing)
├── tempo-client.ts       # Tempo API client with PAT auth
├── tools/                # Tool implementations
│   ├── get-worklogs.ts
│   ├── post-worklog.ts
│   ├── bulk-post.ts
│   ├── delete-worklog.ts
│   └── get-schedule.ts
├── types/                # TypeScript type definitions
│   ├── tempo.ts          # Tempo API types
│   ├── mcp.ts            # MCP validation schemas
│   ├── responses.ts      # JSON response types
│   └── index.ts
└── ui/                   # MCP Apps visual components
    ├── get-schedule/     # Calendar view
    │   ├── index.html
    │   ├── index.ts
    │   └── styles.css
    └── get-worklogs/     # Timesheet grid view
        ├── index.html
        ├── index.ts
        └── styles.css
Build Commands
npm run build: Compile TypeScript + build UI bundles + create MCP bundlenpm run build:ui: Build UI components only (Vite)npm run dev: Build and run the server (stdio)npm run dev:http: Build and run HTTP server (for MCP Apps testing)npm run typecheck: Type checking without compilation
License
ISC License - see package.json for details
Contributing
Contributions are welcome! Please follow the existing code style and ensure all tools work correctly with real Tempo API endpoints.