
deltallm
deltawi/deltallm
Route, manage, and analyze your LLM requests across multiple providers with a unified API interface
Instalação
npx convez-ai deltawi/deltallm1 comando no terminal: detecta o formato do repositório (marketplace ou plugin avulso) e instala via Claude Code. Requer Node 18+ e o Claude Code instalado.
Métricas
README
A tradução para o português deste README ainda está na fila.


What is DeltaLLM?
DeltaLLM is a self-hosted AI gateway that gives you a single OpenAI-compatible API for 100+ LLM providers — with enterprise controls like routing, budgets, guardrails, and team management built in.
One Line Change
# Before: Direct to OpenAI
client = OpenAI(api_key="sk-...")

# After: Through DeltaLLM
client = OpenAI(
    base_url="http://localhost:4002/v1",  # ← Just change this
    api_key="sk-deltallm-key"
)
That's it. Your existing code works unchanged — now with routing, spend tracking, and guardrails.
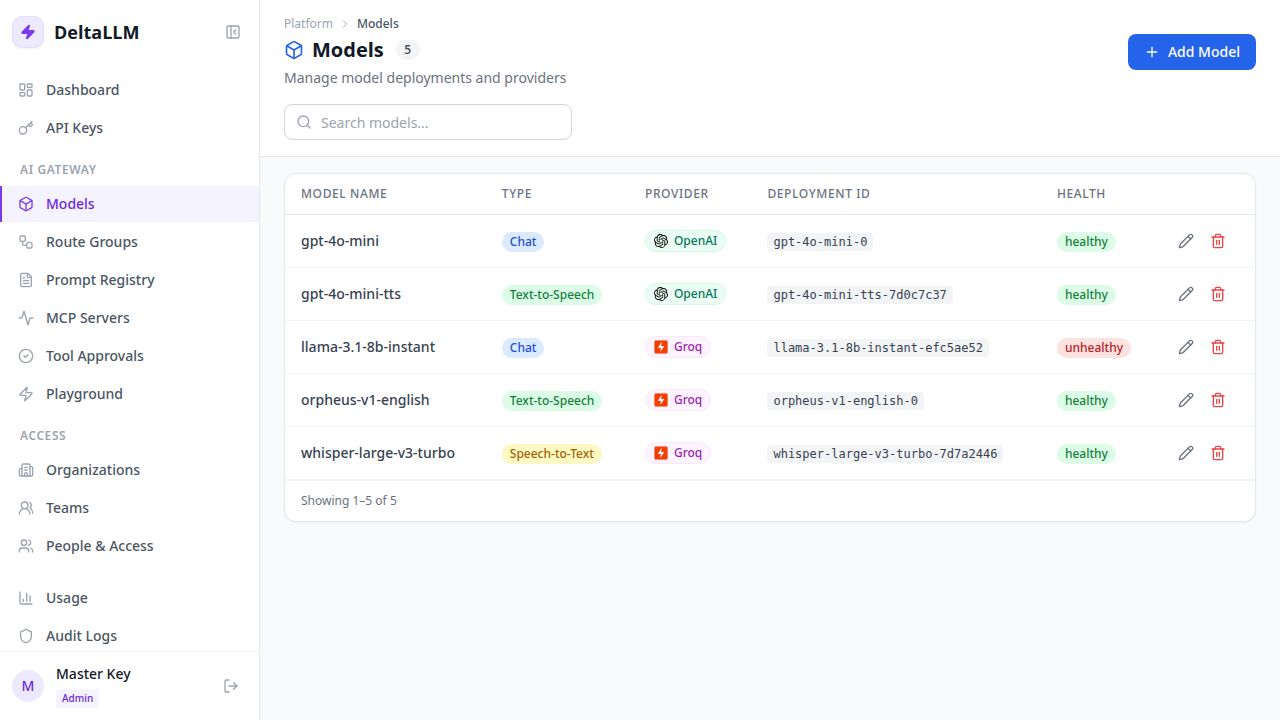
Admin UI
Manage all your model deployments, API keys, teams, and usage from a clean web interface:
Key Features
- Unified API — One OpenAI-compatible endpoint for 100+ LLM providers
- Virtual API Keys — Scoped keys with budgets, rate limits, and model restrictions
- MCP Gateway — Register external MCP servers, expose approved tools safely
- Routing & Failover — Multiple strategies with automatic retries
- Guardrails — Built-in PII detection and prompt injection protection
- Spend Tracking — Per-key, per-team, per-model cost attribution
- RBAC — Role-based access at platform, organization, and team levels
- Admin Dashboard — Full-featured web UI for managing everything
- Response Caching — Memory, Redis, or S3 backends for lower latency and cost
- Observability — Prometheus metrics, request logging, and spend analytics
Docs: https://deltallm.readthedocs.io/en/latest
Choose Your Install Path
- Option 1: Docker Compose: fastest way to run DeltaLLM locally for evaluation.
- Option 2: Kubernetes From a Released Chart: install with Helm from the public chart repository without cloning the repository.
- Option 3: Local Development From the Repo: best path for contributors and for local backend or UI work.
Option 1: Docker Compose
Use Docker Compose if you want the fastest working setup.
1. Clone the repository
git clone https://github.com/deltawi/deltallm.git
cd deltallm
2. Create a local config
cp config.example.yaml config.yaml
For the quickest first successful request, enable one-time model bootstrap in config.yaml:
general_settings:
  model_deployment_source: db_only
  model_deployment_bootstrap_from_config: true
This seeds the sample model_list into the database on first startup. After the first successful boot, set model_deployment_bootstrap_from_config back to false.
3. Generate required secrets
DeltaLLM will not start with placeholder values such as change-me.
python3 -c 'import secrets; print("DELTALLM_MASTER_KEY=sk-" + secrets.token_hex(20) + "A1")'
python3 -c 'import secrets; print("DELTALLM_SALT_KEY=" + secrets.token_hex(32))'
Create a .env file in the project root:
DELTALLM_MASTER_KEY=sk-your-generated-master-key
DELTALLM_SALT_KEY=your-generated-salt-key
OPENAI_API_KEY=sk-your-openai-key
PLATFORM_BOOTSTRAP_ADMIN_EMAIL=admin@example.com
PLATFORM_BOOTSTRAP_ADMIN_PASSWORD=ChangeMe123!
The sample config uses OPENAI_API_KEY. If you want a different provider, edit config.yaml before starting.
4. Start DeltaLLM
docker compose --profile single up -d --build
If you want the full Presidio engine for guardrails instead of the default regex fallback:
INSTALL_PRESIDIO=true docker compose --profile single up -d --build
This starts:
- DeltaLLM on
http://localhost:4002 - PostgreSQL
- Redis
5. Verify the gateway
Check liveliness:
curl http://localhost:4002/health/liveliness
List available models:
curl http://localhost:4002/v1/models \
  -H "Authorization: Bearer $DELTALLM_MASTER_KEY"
If this list is empty, you did not bootstrap a model and must either:
- set
model_deployment_bootstrap_from_config: trueand restart once, or - create a model deployment in the Admin UI before sending requests
6. Send your first request
curl http://localhost:4002/v1/chat/completions \
  -H "Authorization: Bearer $DELTALLM_MASTER_KEY" \
  -H "Content-Type: application/json" \
  -d '{
    "model": "gpt-4o-mini",
    "messages": [
      {"role": "user", "content": "Hello from DeltaLLM"}
    ]
  }'
7. Open the Admin UI
Open http://localhost:4002.
If you set PLATFORM_BOOTSTRAP_ADMIN_EMAIL and PLATFORM_BOOTSTRAP_ADMIN_PASSWORD, you can log in with that initial admin account. You can also keep using the master key for gateway calls.
Option 2: Kubernetes From a Released Chart
Released Helm charts and matching values overlays are published to the public Helm repository at https://deltawi.github.io/deltallm.
helm repo add deltallm https://deltawi.github.io/deltallm
helm repo update
Generate the required secrets first:
export DELTALLM_MASTER_KEY="$(python3 -c 'import secrets; print(\"sk-\" + secrets.token_hex(20) + \"A1\")')"
export DELTALLM_SALT_KEY="$(openssl rand -hex 32)"
Quick-start install with bundled PostgreSQL and Redis:
helm install deltallm deltallm/deltallm \
  --version <chart-version> \
  --namespace deltallm \
  --create-namespace \
  -f https://deltawi.github.io/deltallm/values-eval-<chart-version>.yaml \
  --set secret.values.masterKey="$DELTALLM_MASTER_KEY" \
  --set secret.values.saltKey="$DELTALLM_SALT_KEY" \
  --set-string env[0].name=PLATFORM_BOOTSTRAP_ADMIN_EMAIL \
  --set-string env[0].value=admin@example.com \
  --set-string env[1].name=PLATFORM_BOOTSTRAP_ADMIN_PASSWORD \
  --set-string env[1].value='ChangeMe123!'
If you want the Presidio-enabled image variant from the same chart release:
helm install deltallm deltallm/deltallm \
  --version <chart-version> \
  --namespace deltallm \
  --create-namespace \
  -f https://deltawi.github.io/deltallm/values-eval-<chart-version>.yaml \
  --set secret.values.masterKey="$DELTALLM_MASTER_KEY" \
  --set secret.values.saltKey="$DELTALLM_SALT_KEY" \
  --set-string env[0].name=PLATFORM_BOOTSTRAP_ADMIN_EMAIL \
  --set-string env[0].value=admin@example.com \
  --set-string env[1].name=PLATFORM_BOOTSTRAP_ADMIN_PASSWORD \
  --set-string env[1].value='ChangeMe123!' \
  --set image.tag=v<chart-version>-presidio
values-eval-<chart-version>.yaml is the self-contained quick-start profile. Use values-production-<chart-version>.yaml with external PostgreSQL and Redis for production.
Use the latest GitHub Release version for <chart-version>. The exact copy-paste install commands for each release live in the release notes.
For full Kubernetes examples and values, see docs/deployment/kubernetes.md.
Option 3: Local Development From the Repo
Use this path if you want to work on the backend or UI locally instead of running the full Compose stack.
Requirements
- Python 3.11+
- Node.js 20+
- PostgreSQL 15+
- Redis 7+ optional
1. Install dependencies
uv is the recommended backend installer because the repo includes uv.lock.
uv sync --dev
If you want the full Presidio engine locally for guardrails:
uv sync --dev --extra guardrails-presidio
In another shell for the UI:
cd ui
npm ci
cd ..
2. Export environment variables
export DATABASE_URL="postgresql://postgres:postgres@localhost:5432/deltallm"
export DELTALLM_CONFIG_PATH=./config.yaml
export DELTALLM_MASTER_KEY="$(python3 -c 'import secrets; print(\"sk-\" + secrets.token_hex(20) + \"A1\")')"
export DELTALLM_SALT_KEY="$(openssl rand -hex 32)"
export OPENAI_API_KEY="sk-your-openai-key"
export PLATFORM_BOOTSTRAP_ADMIN_EMAIL="admin@example.com"
export PLATFORM_BOOTSTRAP_ADMIN_PASSWORD="ChangeMe123!"
If Redis is available:
export REDIS_URL="redis://localhost:6379/0"
3. Create config and enable one-time bootstrap if needed
cp config.example.yaml config.yaml
For a fresh database, enable one-time bootstrap in config.yaml if you want the sample model available immediately:
general_settings:
  model_deployment_source: db_only
  model_deployment_bootstrap_from_config: true
4. Initialize Prisma and the database
uv run prisma generate --schema=./prisma/schema.prisma
uv run prisma py fetch
uv run prisma db push --schema=./prisma/schema.prisma
5. Start the backend
uv run uvicorn src.main:app --host 0.0.0.0 --port 8000 --reload
6. Start the UI
cd ui
npm run dev
The local development UI runs at http://localhost:5000 and proxies API requests to the backend on http://localhost:8000.
Useful Links
- Docker quick start
- Local installation
- Gateway usage examples
- Configuration reference
- Model configuration
- Authentication
Testing
uv run pytest
Support & Contribute
⭐ Star this repo if you find it useful!
- 🐛 Report issues
- 💡 Request features
- 📖 Read the docs
- 🤝 PRs welcome — see Local Development to get started
License
See LICENSE.